Whole-slide microscopic imaging
Contents
The Orthanc project provides three official tools to support DICOM for whole-slide microscopic imaging (WSI):
A so-called “DICOM-izer” command-line tool that converts whole-slide images to DICOM series, following Supplement 145.
A plugin that extends Orthanc with a Web viewer of whole-slide images for digital pathology.
Another command-line tool that converts a DICOM series stored inside Orthanc, to a standard hierarchical TIFF image.
Check out our demonstration server.
For researchers: Please cite this paper.
Compilation
Static linking
The procedure to compile the WSI framework is similar of that for the core of Orthanc. The following commands should work for most UNIX-like distribution (including GNU/Linux):
# Firstly, compile the command-line tools
$ mkdir Applications/Build
$ cd Applications/Build
$ cmake .. -DSTATIC_BUILD=ON -DCMAKE_BUILD_TYPE=Release
$ make

# Secondly, compile the viewer plugin
$ mkdir ../../ViewerPlugin/Build
$ cd ../../ViewerPlugin/Build
$ cmake .. -DSTATIC_BUILD=ON -DCMAKE_BUILD_TYPE=Release
$ make
The compilation will produce 3 binaries:
Applications/Build/OrthancWSIDicomizer, which contains the DICOM-izer.Applications/Build/OrthancWSIDicomToTiff, which contains the DICOM-to-TIFF converter.ViewerPlugin/Build/OrthancWSI, which is a shared library containing the viewer plugin for Orthanc.
Microsoft Windows
Note that pre-compiled binaries for Microsoft Windows are available.
Dynamic linking
If static linking is not desired, here are build instructions for Ubuntu 16.04 (provided build dependencies for the core of Orthanc have already been installed):
$ sudo apt-get install libopenjpeg-dev

# Firstly, compile the command-line tools
$ mkdir Applications/Build
$ cd Applications/Build
$ cmake .. -DCMAKE_BUILD_TYPE=Release -DUSE_SYSTEM_ORTHANC_SDK=OFF
$ make

# Secondly, compile the viewer plugin
$ mkdir ../../ViewerPlugin/Build
$ cd ../../ViewerPlugin/Build
$ cmake .. -DCMAKE_BUILD_TYPE=Release -DUSE_SYSTEM_ORTHANC_SDK=OFF -DALLOW_DOWNLOADS=ON
$ make
Usage of the plugin
You of course first have to install Orthanc. Once
Orthanc is installed, you must change the configuration file to tell Orthanc where it can find the plugin: This is
done by properly modifying the Plugins configuration option. You
could for instance use the following configuration file under
GNU/Linux:
{
  "Name" : "MyOrthanc",
  [...]
  "Plugins" : [
    "/home/user/orthanc-wsi/ViewerPlugin/Build/libOrthancWSI.so"
  ]
}
Orthanc must of course be restarted after the modification of its configuration file. The WSI plugin has no specific configuration option.
Once a DICOM series is opened using Orthanc
Explorer, a yellow button entitled Whole-Slide
Imaging Viewer will show up for series corresponding to whole-slide
images. This button will open the WSI viewer for that particular
series. This behavior can be seen on the Orthanc Explorer interface
running on our WSI demonstration server.
Support of IIIF
Starting with its release 2.0, the WSI plugin can act as a data source that follows the IIIF specification. This turns Orthanc into a tool to deliver collection of high-resolutions images over the web through IIIF, while simultaneously enabling a standard, long-term preservation of those collections through DICOM vendor-neutral archiving.
REST API
The WSI plugin associates each of the DICOM series stored by
Orthanc whose Orthanc identifier is seriesId,
with a IIIF-compliant Presentation API 3.0 manifest located at URI
/wsi/iiif/series/{seriesId}/manifest.json in the Web server of
Orthanc. In turn, this manifest points to a IIIF-compliant Image API
3.0 data source to deliver the
DICOM series over the web.
Note that this data source is not only available for the whole-slide microscopic series, but also for the other types of medical images, which enables both telepathology and teleradiology workflows:
In the case of a whole-slide image, the URI to the IIIF data source is:
/wsi/iiif/tiles/{seriesId}/info.json.In the case of a regular radiology series, one IIIF data source is associated with each frame of the DICOM series. Indeed, the DICOM model of the real-world specifies that a single DICOM series can contain multiple instances, which in turn can contain multiple frames. The URI to the IIIF data source corresponding to one individual frame of interest is:
/wsi/iiif/frames/{seriesId}/{frameIndex}/info.json, whereframeIndexis the index of the frame in the DICOM series. Themanifest.jsonof the parent DICOM series automatically aggregates all the frames of the series as a single collection.
Web user interface
Orthanc Explorer contains a button to easily copy/paste the URL of the IIIF manifest corresponding to a DICOM series:
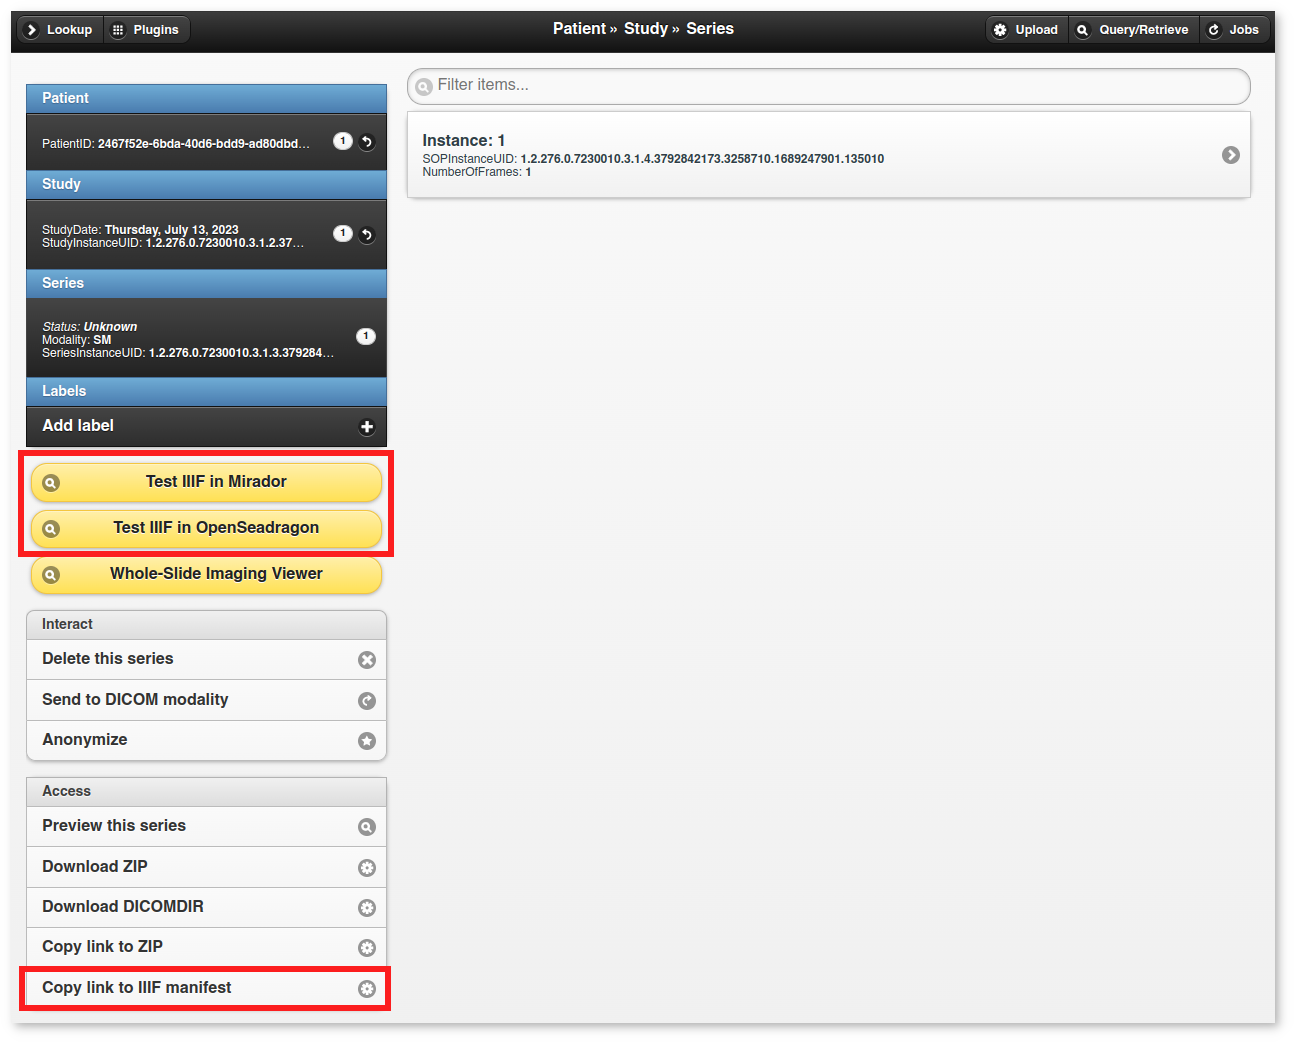
Furthermore, as can be seen in the image above, buttons can be enabled to test the opening of the IIIF data source using Mirador and/or OpenSeadragon.
Pay attention to the fact that the assets of Mirador and OpenSeadragon (notably JavaScript) are loaded from the unpkg CDN, which necessitates an Internet connection. For this reason, these assets are disabled by default.
Configuration options
The IIIF features can be configured using the following configuration file of Orthanc:
{
  "Name" : "MyOrthanc",
  [...]
  "Plugins" : [
    "/home/user/orthanc-wsi/ViewerPlugin/Build/libOrthancWSI.so"
  ],
  "WholeSlideImaging" : {
    "EnableIIIF" : true,           // Can be used to disable support of IIIF
    "OrthancPublicURL" : "http://localhost:8042/",
    "ServeMirador" : false,        // Whether to show the "Test IIIF in Mirador" button
    "ServeOpenSeadragon" : false,  // Whether to show the "Test IIIF in OpenSeadragon" button
    "ForcePowersOfTwoScaleFactors" : true   // Can be used to disable the compatibility mode
  }
}
A few remarks:
The
OrthancPublicURLoption must be adapted if Orthanc is branched behind a reverse proxy.In the case of a whole-slide image, the
ForcePowersOfTwoScaleFactorsoption instruct the WSI plugin to only publish the pyramid levels whose scale factors follow a powers-of-two patterns (i.e., 1, 2, 4, 8, 16…). This provides maximum compatibility with viewers (for instance, consider this issue), but can break a smooth delivery of high-resolution images whose pyramid is irregular. Compatibility mode is enabled by default.
Command-line tools
The command-line tools OrthancWSIDicomizer and
OrthancWSIDicomToTiff provide documentation of all their options
if started with the --help parameter:
$ ./OrthancWSIDicomizer --help
$ ./OrthancWSIDicomToTiff --help
In this section, we review the most common usages of these tools.
Transcoding a DICOM image
The most simple usage consists in converting some whole-slide image to DICOM, then uploading it to Orthanc:
$ ./OrthancWSIDicomizer Source.tif
This command will transcode some hierarchical, tiled TIFF image called Source.tif,
and push the generated DICOM files to the default Orthanc server
(running on localhost and listening to HTTP port 8042) using
its REST API. The log of the command will give you the
identifier of the generated series, so that you
can locate it in Orthanc Explorer. This conversion is fast, as no
re-encoding takes place: If the source TIFF image contains JPEG tiles,
these tiles will be simply written as such.
Obviously, you can specify the parameters of the REST API of your target Orthanc server:
$ ./OrthancWSIDicomizer Source.tif --orthanc=http://localhost:8042/ --username=orthanc --password=orthanc
It is also possible to write the DICOM instances directly onto some folder of the filesystem (the target folder must be existing):
$ ./OrthancWSIDicomizer Source.tif --folder=/tmp/dicomized/
This command will create a set of files entitled like
/tmp/dicomized/wsi-XXXXXX.dcm. You can modify this pattern using
the command-line option --folder-pattern.
By default, the DICOM-izer will spread the output series as a set of
DICOM files whose size stays below 10MB. This prevents the appearance
of huge files, which speeds up further processing. This behavior can
be controlled using the --max-size command-line option.
Re-encoding a DICOM image
The section above explained how to transcode whole-slide images, without modifying the compression scheme of their individual tiles (which is most commonly JPEG). You can instruct the DICOM-izer to re-encode each and every individual tile as follows:
$ ./OrthancWSIDicomizer Source.tif --reencode=1 --compression=jpeg2000
This example would create a series of DICOM instances encoded using
the JPEG2k transfer syntax (whose UID is 1.2.840.10008.1.2.4.90).
As JPEG2k is not natively supported by many Web browsers, the Web
viewer plugin would transparently convert such JPEG2k-encoded tiles to
PNG images.
It is also possible to re-encode the image so as to reduce disk space consumption by changing the JPEG quality:
$ ./OrthancWSIDicomizer Source.tif --reencode=1 --compression=jpeg --jpeg-quality=10
The DICOM-izer also allows to re-generate all the multi-resolution pyramid. This is extremely importantly to enhance the user experience of the Web interface, if the source image only features the finest zoom level of the whole-slide image:
$ ./OrthancWSIDicomizer Source.tif --pyramid=1 --smooth=1
The number of levels in the pyramid can be controlled using the
--levels command-line option. The --smooth=1 option tells the
DICOM-izer to apply Gaussian smoothing when re-scaling the
image, in order to avoid the appearance of aliasing in the
multi-resolution pyramid. This produces nicer images, at the price of
higher computation time.
All the examples described in this section are obviously much more
CPU-intensive than simple transcoding. The DICOM-izer takes advantage
in multi-threading to reduce the computation time. By default, it will
use half the number of logical CPU cores that are available. This
behavior can be fine-tuned using command-line option --threads.
Proprietary file formats
Out-of-the-box, the DICOM-izer supports standard hierarchical TIFF images. Some commonplace image formats (PNG and JPEG) can be DICOM-ized as well. However, whole-slide images can come in many proprietary file formats. To re-encode such images, the DICOM-izer relies upon the OpenSlide toolbox.
For this feature to work, you have to tell the command-line tool where
it can find the OpenSlide shared library. GNU/Linux distributions
generally provide packages containing the OpenSlide shared library
(e.g. under Debian/Ubuntu, simply install the libopenslide0
package):
$ ./OrthancWSIDicomizer --openslide=libopenslide.so CMU-1-JP2K-33005.svs
Pre-compiled Microsoft Windows binaries of this shared library can be found on the OpenSlide homepage (Note that you should copy all .dll files from the OpenSlide package next to the OrthancWSIDicomizer executable):
$ ./OrthancWSIDicomizer --openslide=libopenslide-0.dll CMU-1-JP2K-33005.svs
Note that this operation implies the re-encoding of the source image from the proprietary file format, which is much more time-consuming than simply transcoding a TIFF image.
Specifying a DICOM dataset
So far, we have only been discussing the whole-slide image by itself, and not the medical information that is associated with each DICOM file. The DICOM tags that must be embedded inside the generated DICOM series can be specified using the user-friendly JSON file format. You would first generate a minimal, sample JSON dataset as follows:
$ ./OrthancWSIDicomizer --sample-dataset > dataset.json
Secondly, you would edit the just-generated dataset.json file
using any text editor (or any script interfaced with your RIS), so as
to encode medical information associated with the image
acquisition. Finally, tell the DICOM-izer where it can find the
dataset when re-encoding or transcoding the image:
$ ./OrthancWSIDicomizer Source.tif --dataset=dataset.json
Note that it is always a good idea to check whether all the required
DICOM tags have been properly provided, e.g. by running the
dciodvfy command-line tool provided by David Clunie that checks the
compliance of DICOM files.
Converting DICOM to TIFF
The whole-slide imaging framework for Orthanc also provides a command-line tool that converts some DICOM series, as a standard hierarchical, tiled TIFF image. This is important if you wish to export some DICOM file to a framework that does not support DICOM Supplement 145.
Here is how you would convert a whole-slide image stored in the default Orthanc server:
$ ./OrthancWSIDicomToTiff fdf53e42-06d7377a-c24c59fd-3704e72d-f4c75b68 Target.tif
You just have to provide the Orthanc identifier of the series of interest (that can be retrieved using Orthanc Explorer or the REST API), and the path to the target TIFF file.
Similarly to the DICOM-izer, the command-line options --orthanc,
--username and --password can be used to specify the
parameters of your Orthanc server.
Interface with Cytomine
Cytomine is an “open-source rich internet application for collaborative analysis of multi-gigapixel images.” Starting with release 1.1 of the whole-slide imaging framework for Orthanc, it is possible to exchange digital pathology images back and forth between Orthanc and Cytomine according to the following workflow:
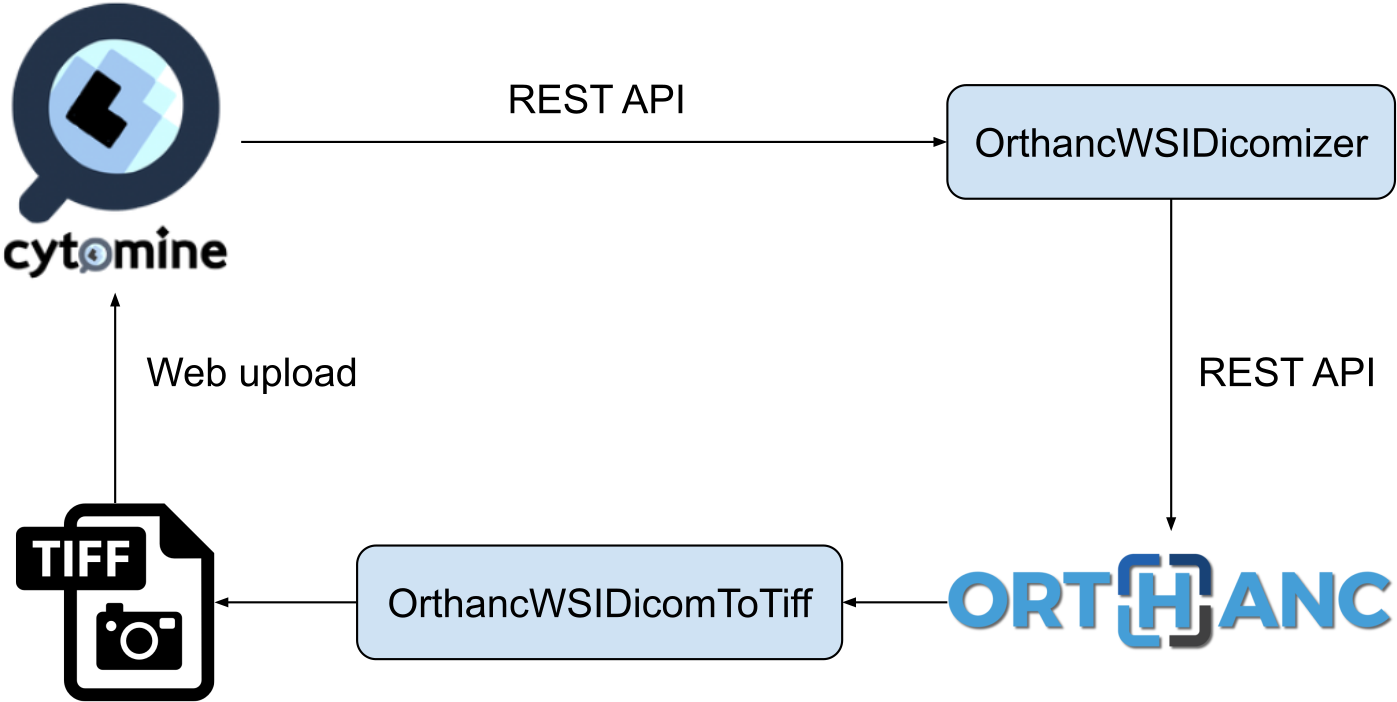
As can be seen, OrthancWSIDicomizer imports the source image from
Cytomine using its REST API, then puts the converted DICOM instances
onto Orthanc using its REST API. Here is a minimalist sample call to
the OrthancWSIDicomizer command-line tool to convert an image from
a Cytomine server onto an Orthanc server listening on
localhost:8042 with default parameters
$ ./OrthancWSIDicomizer --cytomine-url=http://XXX --cytomine-image=325 \
                        --cytomine-public-key=YYY --cytomine-private-key=ZZZ \
                        --threads=4 --pyramid=1 --username=orthanc --password=orthanc --verbose
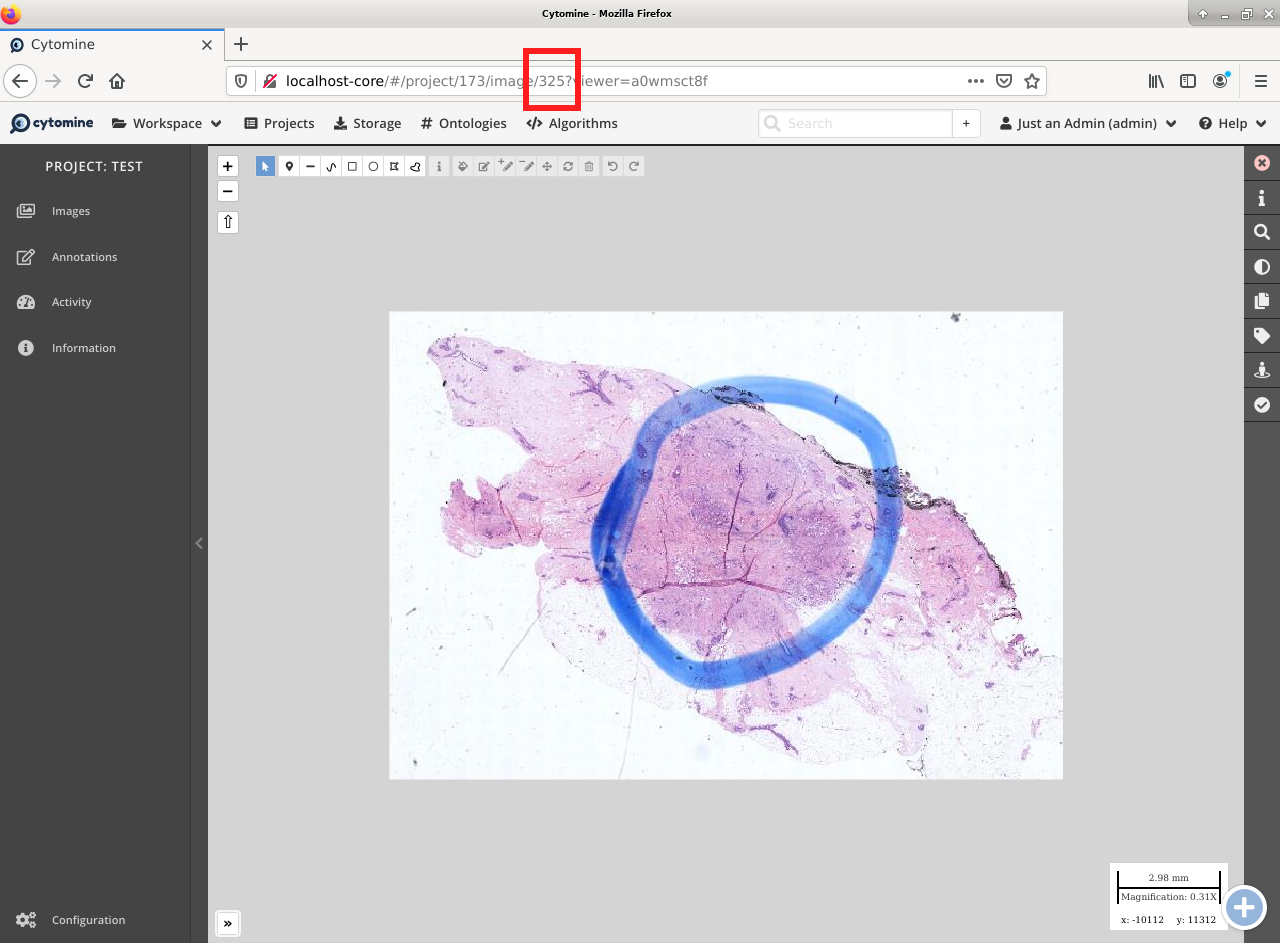
The --cytomine-image parameter corresponds to the ID of the Image
Instance
of interest. This ID can easily be retrieved from the Web interface of
Cytomine:
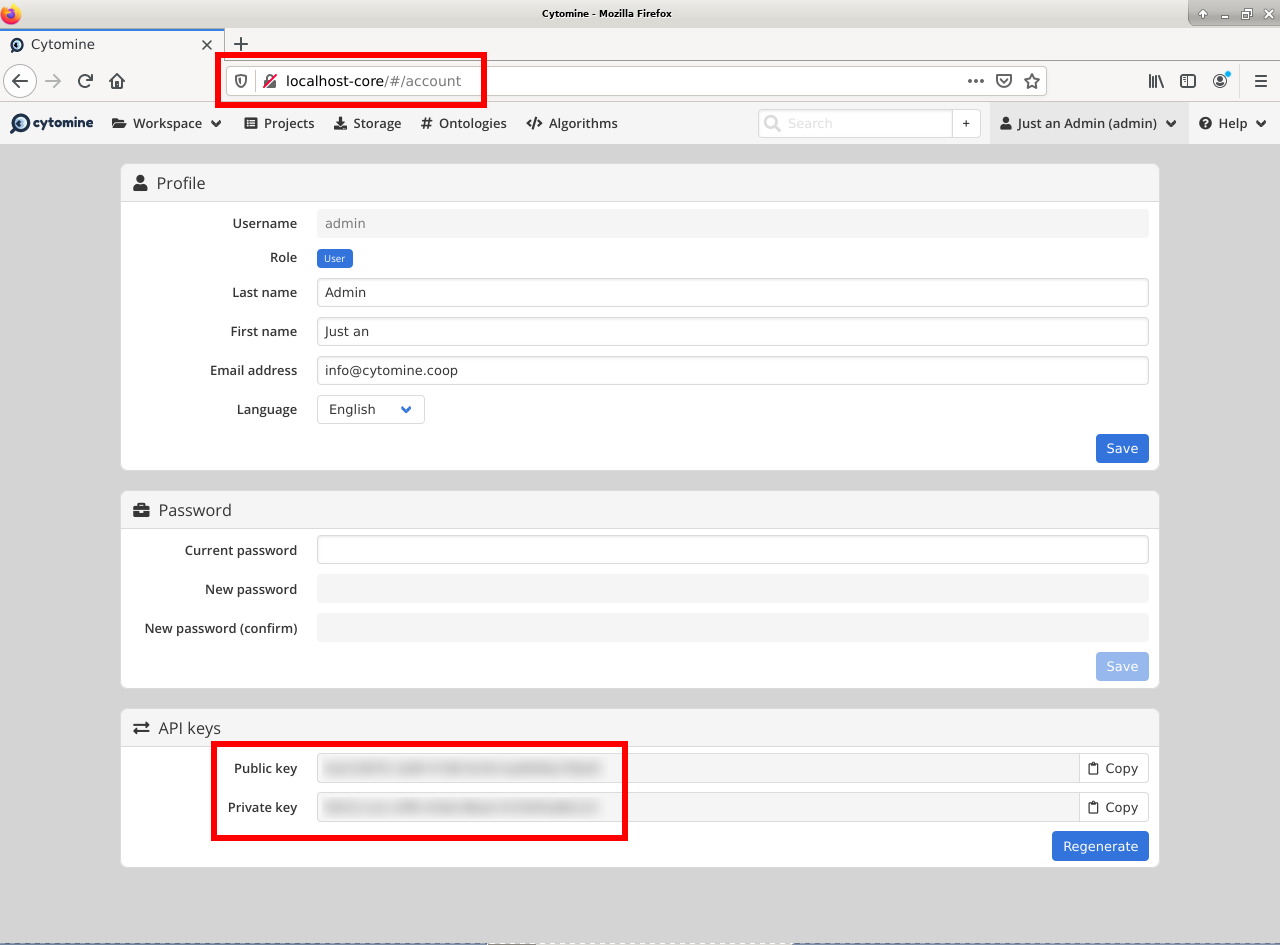
The --cytomine-public-key and --cytomine-private-key
parameters grant access to the REST API of Cytomine, and can be found
in the parameters of your account using the Web interface of Cytomine:
REST API
Besides providing an user interface, the plugin for whole-slide imaging also enrich the REST API of Orthanc with some new URIs, that are described in this section.
Note that the Web interface of the plugin exclusively relies upon this enriched REST API in order to display whole-slide images using the OpenLayers 3 JavaScript library.
Information about a whole-slide image
You can check whether a DICOM series associated with some known
Orthanc ID id corresponds to a whole-slide
image by calling the /wsi/pyramids/{id} URI. A HTTP status code
404 is returned if the series is not a whole-slide image:
$ curl -v http://localhost:8042/wsi/pyramids/ca2cc2ef-2dd8be12-0a4506ae-d565b7e1-a4ca9068
[...]
< HTTP/1.1 404 Not Found
However, if the identifier corresponds to a valid whole-slide image, you will get information about its multi-resolution pyramid, formatted using JSON:
$ curl http://localhost:8042/wsi/pyramids/f0ed5846-2ce36a70-d27bb5d3-6ed9dac2-ee638d85
{
  "ID" : "f0ed5846-2ce36a70-d27bb5d3-6ed9dac2-ee638d85",
  "Resolutions" : [ 1, 2, 4, 8, 16 ],
  "Sizes" : [
    [ 10800, 5400 ],
    [ 5400, 2700 ],
    [ 2700, 1350 ],
    [ 1350, 675 ],
    [ 675, 338 ]
  ],
  "TileHeight" : 512,
  "TileWidth" : 512,
  "TilesCount" : [
    [ 22, 11 ],
    [ 11, 6 ],
    [ 6, 3 ],
    [ 3, 2 ],
    [ 2, 1 ]
  ],
  "TotalHeight" : 5400,
  "TotalWidth" : 10800
}
The size of the finest level of the pyramid is verbatim available from
this output (in the example above, 10,800 x 5,400 pixels), as well
as the size of each individual tile (512 x 512 pixels). The
TilesCount gives, for each level of the pyramid (sorted in
decreasing resolutions), the number of tiles along each dimension: In
the example above, the coarsest level contains 2 tiles along the X
axis, and 1 tile along the Y.
Note that the interpretation of the whole-slide image is done transparently by the plugin, which frees the user from parsing each and every DICOM instance in the series.
The medical information associated with the series or its instances can as usual be retrieved using the core REST API of Orthanc.
Decoding the individual tiles
As discussed above, the /wsi/pyramids/{id} gives information about
the number of tiles in each level of the multi-resolution pyramid
associated with series id.
You can then retrieve the individual tiles of each level using the
/wsi/tiles/{id}/{z}/{x}/{y} URI, where z corresponds to the
level of interest, and (x, y) the index of the tile of
interest at this level. All of these indices start at zero, the level
z=0 corresponding to the finest level.
For instance, here is how to retrieve the central tile of the finest
level of the pyramid (that contains 22 x 11 tiles in our example):
$ curl http://localhost:8042/wsi/tiles/f0ed5846-2ce36a70-d27bb5d3-6ed9dac2-ee638d85/0/11/5 > tile.jpg
$ identify ./tile.jpg
./tile.jpg JPEG 512x512 512x512+0+0 8-bit DirectClass 88.5KB 0.000u 0:00.000
As can be seen, the plugin has returned a JPEG image of size 512 x
512, which corresponds to the size of the tiles in this sample
image. If trying to access a tile outside the image, the plugin will
return with an HTTP status code that is not 200 OK. Similarly,
here is how to retrieve a tile at the coarsest level (the pyramid has
5 levels in our example):
$ curl http://localhost:8042/wsi/tiles/f0ed5846-2ce36a70-d27bb5d3-6ed9dac2-ee638d85/4/0/0 > tile.jpg
Depending upon the transfer syntax of the DICOM instances, the tile
might not be encoded using JPEG. Indeed, if the transfer syntax is
uncompressed (UID 1.2.840.10008.1.2 and friends) or JPEG2k
lossless (UID 1.2.840.10008.1.2.4.90), the plugin will
transparently re-encode the tile to PNG in order to avoid any
destructive compression.
NB: Starting with version 2.0 of the WSI plugin, the
/wsi/tiles/{id}/{z}/{x}/{y} route accepts the Accept HTTP
header, which can be used to force the compression of the tile. The
allowed values for Accept are: image/png, image/jpeg, and
image/jp2 (which corresponds to JPEG2k).